The Defining Mold Problem of Southeastern Pennsylvania
If there is one thing that separates mold work in Montgomery County from mold work in most of the United States, it is this: nearly every house here has a full basement, and that basement is the reason. Roughly speaking, the housing stock of Upper Merion, Tredyffrin, Plymouth, Whitpain and the boroughs along the Schuylkill sits on masonry boxes buried four to eight feet in the ground. Those boxes are cold, they are in permanent contact with soil moisture, and in a great many homes they have been finished with materials that should never have been put against them.
Understanding why a basement grows mold is not complicated, but it is counter-intuitive, and almost every homeowner arrives at it with the wrong mental model. The wrong model is: water is getting in through a hole, find the hole. Sometimes that is true. More often, in this region, no hole exists at all.
Mechanism One: Summer Condensation (No Leak Required)
This is the largest single cause of basement mold in this climate and the most consistently misdiagnosed.
A buried foundation wall stays close to deep-earth temperature, which in southeastern Pennsylvania is roughly 52 to 58°F year round. It does not warm up much in July, because it is surrounded by soil that does not warm up much in July. Meanwhile, from roughly June through September, outdoor air in this region carries dew points in the mid-60s to low 70s°F for weeks at a time.
Dew point is the temperature at which air must release its water as liquid. If air with a 68°F dew point reaches a 55°F wall, it is thirteen degrees below its dew point at that surface. It has no choice: water condenses out onto the masonry. The same happens on cold copper supply lines, which can drip continuously through August, and on the underside of the floor above.
The universal homeowner instinct is to open the basement windows on a warm day to dry it out. In this climate, from June to September, that is precisely backwards. You are importing 70°F dew-point air and delivering it to 55°F masonry, which deposits more water on the wall than the ventilation removes. The same logic applies to running a dehumidifier with the windows open — you are dehumidifying Pennsylvania. Close it up and dehumidify mechanically. This single change resolves a meaningful share of basement mold complaints in the region.
Mechanism Two: Capillary Rise Through the Masonry
Concrete, block and stone are porous. Water in the surrounding soil is drawn upward through those pores against gravity, the same way water climbs a paper towel. Older foundations have no capillary break between the footing and the wall — the concept did not enter standard practice until well into the twentieth century, and in the stone foundations of Gulph Mills, Valley Forge, Wayne and old Norristown it never existed at all.
The signature is distinctive and easy to read once you know it. Dampness is constant rather than correlated with rain. It is concentrated in the lowest portion of the wall and diminishes with height. And it very often produces efflorescence — the white, crystalline, powdery bloom left behind when water carrying dissolved mineral salts evaporates at the inside face of the wall. Efflorescence is not mold. It is physical proof that liquid water is passing through the wall, and it is a warning that the conditions for mold are present.
Mechanism Three: Bulk Water from Outside
The one people expect. Rain and surface runoff physically entering the structure, correlated with weather and worst after prolonged rainfall. In this housing stock the usual causes are, in rough order of frequency: clogged or disconnected gutters; downspouts discharging within a metre of the foundation; grading that has settled over forty years so the ground now falls toward the house; window wells with no functioning drainage that fill and overtop; deteriorated mortar joints; and sump systems that are undersized, have a stuck check valve, have no battery backup, or discharge so close to the house that the same water simply returns.
Mechanism Four: The Finished Basement Wall
This deserves its own section, because it is responsible for more concealed mold in Montgomery and Chester County housing than anything else, and because the homes affected usually look perfect.
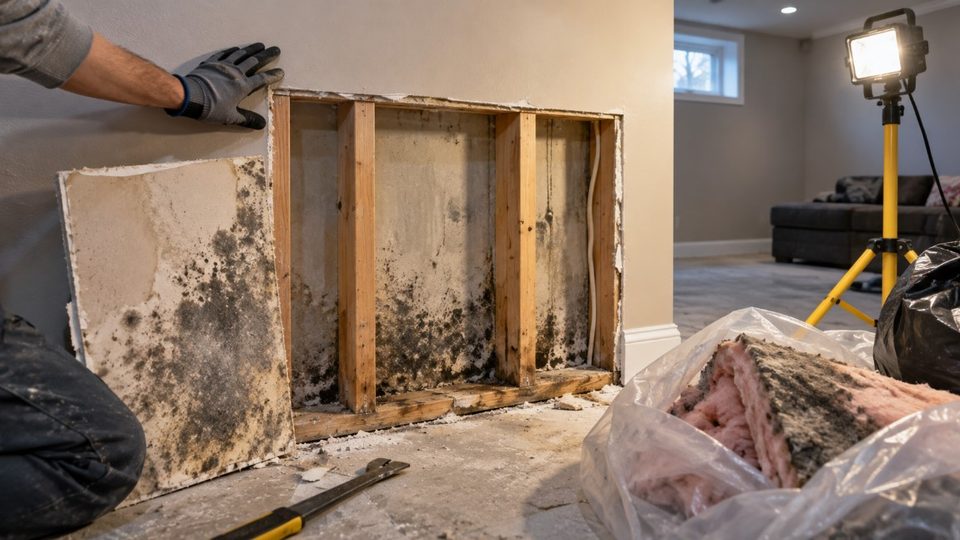
From roughly the late 1970s through the early 2000s, the standard way to finish a basement was: erect a wood stud wall directly against the foundation, install fiberglass batt insulation between the studs, and hang paper-faced drywall over it. Carpet went on the floor. This was normal, code-compliant, and is present in thousands of homes across Chesterbrook, Blue Bell, Collegeville, North Wales, Lansdale, Royersford and every 1980s and 1990s subdivision in the county.
Every element of that assembly is wrong for this climate, and the failure is systematic rather than accidental:
- The foundation is cold and periodically damp. That is a given and cannot be changed.
- Fiberglass does not stop air or vapour. It is a filter, not a barrier. Humid air moves through it freely and reaches the cold masonry behind.
- Fiberglass holds moisture against the drywall. Once damp it stays damp, and it loses most of its insulating value while wet.
- Drywall paper facing is cellulose. It is close to an ideal fungal substrate — and in a dark, still, humid cavity, an ideal environment.
- The whole thing is sealed from view. Growth begins on the concealed face and can progress for years before it produces an odour in the room, let alone a visible stain.
When one of these walls is finally opened, homeowners are routinely shocked. The finished side looked immaculate. The back of the drywall is black.
How It Should Be Rebuilt Instead
If you are remediating a failed finished basement, or finishing one for the first time, this is the single most valuable section on this page. The principle: put the insulation on the outside of the moisture-sensitive material, not the inside, and do not create a cavity where humid air can reach a cold surface.
- Fix the exterior water firstGutters, downspouts extended six feet or more, grading corrected, window wells drained. Nothing built inside will survive an uncorrected exterior problem.
- Dehumidify and observe before buildingRun a properly sized dehumidifier for a season and watch what the wall actually does. This is cheap and it prevents an expensive mistake.
- Rigid foam directly against the foundationExtruded or foil-faced polyisocyanurate board adhered or mechanically fastened to the masonry, seams taped. This warms the interior surface above the dew point and is itself unaffected by moisture. This is the critical layer.
- Frame in front of the foam, not against the wallThe stud wall stands clear of the masonry, insulated by the foam behind it. If additional insulation is wanted, use mineral wool rather than fiberglass — it is hydrophobic and does not support growth.
- Use paperless or fibreglass-faced boardMold-resistant gypsum board with a fibreglass mat instead of paper facing, or cement board. Removes the cellulose food source entirely.
- No carpet directly on the slabCarpet pad is an open-cell sponge sitting on a cool, damp surface. Use a floating floor over a dimpled membrane, sealed and finished concrete, or LVP designed for below-grade use.
- Insulate the rim joist properlyClosed-cell spray foam or carefully cut and sealed rigid foam. Never a bare fiberglass batt, which is the standard installation and is guaranteed to condense behind it.
- Permanent dehumidification, plumbed to a drainSet to 45–50%, running April through October, discharging to the sump or a floor drain. A dehumidifier draining into a bucket is a dehumidifier that will eventually be off.
Where to Look in Your Own Basement
| Location | What you are looking for |
|---|---|
| Bottom 8" of the foundation wall | Staining, white efflorescence, flaking paint, dark patches |
| Base of drywall and behind baseboards | Softness, a wavy or bulging line, discolouration, separation from the floor |
| The rim joist, above the foundation wall | Dark staining on the wood, damp or compressed fiberglass, musty smell when you pull the batt |
| Behind and under stored cardboard | Cardboard is a moisture indicator — if the bottom of the box is soft, the slab is damp |
| Cold water supply lines in summer | Active dripping and staining on whatever is below them |
| Around and inside the sump pit | Standing water, a pump that never runs or runs constantly, no cover, no backup |
| Under the stairs and in the corners | Dead-air zones with the poorest circulation — growth appears here first |
| Behind the washer and water heater | Slow leaks that run for months out of sight |
Remediating a Basement Properly
The sequence follows standard IICRC S520 practice, with a few basement-specific points worth knowing.
Removal is usually more extensive than expected. If a finished wall has failed, the drywall, the insulation and the bottom plate generally all come out, and the cut line goes well above the visible damage — commonly to four feet or the full height — because the concealed face is worse than the visible one. Homeowners frequently expect a patch and receive a gut. That is not upselling; it is what the assembly requires.
Drying takes longer than in an above-grade room. Masonry holds a great deal of water and releases it slowly, and the space has limited natural air exchange. Expect drying equipment to run for several days after the demolition finishes, with daily logged readings. A contractor who pulls the equipment after 48 hours on a basement job is working to a schedule rather than a measurement.
Radon is worth testing while you are down there. Montgomery and Chester Counties sit in an area of elevated radon potential, and roughly 40 percent of Pennsylvania homes tested exceed the EPA action level. Radon and moisture share entry pathways — the slab-wall joint, cracks, the sump pit — and sealing work for one often benefits the other. Unlike mold, radon mitigation in Pennsylvania is regulated: the DEP certifies testers and mitigators, so there is a real credential to verify.
Frequently Asked Questions
That odour is microbial volatile organic compounds, and it means active growth somewhere — odour is produced by living colonies. In a finished basement the overwhelmingly likely location is the back of the drywall, on the bottom plate, or in the fiberglass, all of which are invisible. In an unfinished basement, check the rim joist behind the insulation batts, under the stairs, behind stored boxes, and the underside of the subfloor. Confirming it takes moisture metering across the wall, a thermal scan, and often a small borescope port placed low on the wall where a baseboard will cover the repair. Do not ignore a persistent musty smell on the basis that nothing is visible — in this region, invisible is the normal presentation.
It will prevent new growth, and in a basement whose only problem is summer condensation it can be the whole solution going forward. It will not remove growth that already exists, and it cannot dry out a wall that is receiving liquid water from outside. So the honest sequencing is: fix any bulk water source, remove existing contaminated material, then dehumidify permanently to stop it recurring. Sizing and drainage are where people go wrong — a small consumer unit in a 1,200 square foot basement will run continuously and never reach setpoint, and any unit draining into a bucket will eventually be switched off and forgotten. Size it properly, plumb it to the sump or a floor drain, and set it to 45 to 50 percent.
General market ranges for this area: a small contained area such as one wall section or behind a water heater, roughly $800 to $2,500. Partial finished basement with wall removal, drying and clearance testing but excluding reconstruction, roughly $3,000 to $8,000. Full finished basement gut and remediation, commonly $6,000 to $18,000. Add reconstruction on top of that, typically $25 to $60 per square foot depending on finish level. Unfinished basement cleaning and treatment with dehumidification, roughly $1,500 to $5,000. These are planning ranges rather than quotes — see the full cost guide.
It depends entirely on which mechanism is at work, and this is exactly why diagnosis matters before anyone sells you a system. If the basement is damp only in summer and dry in winter, it is condensation, and interior waterproofing will do nothing while a dehumidifier will solve it. If it is damp specifically after heavy rain, it is bulk intrusion, and the first fix is exterior — gutters, downspout extensions, grading — which is cheap and frequently sufficient. If it is constantly damp at the base of the wall with efflorescence, it is capillary rise, which is managed rather than eliminated. Interior drainage systems and sump upgrades are legitimate and sometimes necessary, but they are the answer to a specific diagnosis, not a default. Be cautious of any company that arrives with a single solution before measuring anything.
Three things, and they matter more than anything else you will choose. First, sort out the exterior water and then run a dehumidifier for a full summer while watching what the wall actually does — you want to know its behaviour before you cover it. Second, put rigid foam board directly against the masonry with taped seams, and frame in front of it; never put a stud wall and fiberglass batts straight against the foundation. Third, use paperless or fibreglass-faced gypsum board and do not lay carpet directly on the slab. That assembly costs perhaps fifteen to twenty percent more than the conventional one and it is the difference between a basement that lasts and one you will be tearing out in a decade.
No. White, crystalline, powdery deposit on masonry is efflorescence — mineral salts left behind as water evaporates out of the wall. It brushes off dry and dissolves in water. Mold is filamentous and typically fuzzy, and is usually green, black, grey or brown. That said, efflorescence is not something to ignore: it is direct evidence that liquid water is moving through that wall, which is the precondition for everything else on this page. Treat it as a diagnostic finding rather than a cosmetic one.